Showing posts with label 3-D. Show all posts

Saturday, September 29, 2012

Festive Snowman

 
I love Snowmen!  So do a few of my friends so I'm sure it will go to one of them.  Started with a 1 1/4" x 12" strip of whisper white card stock and scored every 1/8" and used Sticky Strip to adhere the ends together.  The rosette was then held down and I used Hot Glue in the center to hold it together.  I free hand cut the nose, the eyes are from the Owl Builder Punch along with the hearts on his smile.  Smile made with Oval Punch, slide paper in just a bit and cut then slide it back in and cut again, you can make your smile thick or thin depending on your taste.  For the holly leaves, I used the oval punch scored down the middle and did some more free hand cutting.  The berries were punched using the Cupcake Builder punch.  I made the bow tie with one of the Holiday Ornaments Framelits die cut twice and hot glued the center together.  To give a little definition to the tie, I used a black sharpie.  The card size is 5 1/4" x 10 1/2", stamped the snowflakes in Versamark and then sprayed with Champagne Shimmer mist mixed with rubbing alcohol for some shimmer. 
 
Thanks for stopping by :-)
 
Cindy
 
 
Stamps:  Snow Swirled
Paper:  Crumb Cake, Whisper White, Basic Black, Real Red, Gumball Green, Pumpkin Pie, Red & Silver Glimmer
Ink:  Versamark, Real Red
Accessories:  Punches - Corner Rounder, Owl Builder, Cupcake Builder, Large Oval.  Holiday Ornaments Framelits, White Gel Pen, Simply Scored, Hot Glue, Sticky Strip, Dimensionals, Champagne Shimmer Paint
 

Wednesday, September 26, 2012

Autumn Post-it Holders


Decided to make some post-it note holders, I've made some in the past but I really like the pen holder on this one!  I thought they would be hard to make but not so, super easy :-)
 
Cut paper:  7 3/8" x 3 1/4"
Score at:  3 1/8, 3 1/2 & 3 7/8
Fold score lines then fold just the middle score line and then cut up to the next score line twice to make the pen holder.
Fold the pen holder part out and use sticky strip and fold down to keep it in place, add 3x3 post-it notes and decorate as desired.  
 
This weekend I'll take some photo's and post them so you can see how it goes together.
 
Thanks for stopping by :-)
 
Cindy
 
 
Stamps:  Gently Falling, Just Believe
Paper:  Orchard Harvest and Natural Composition DSP, More Mustard, Very Vanilla
Ink:  Island Indigo, More Mustard, Pool Party, Tangerine Tango, Early Espresso, Crumb Cake
Accessories:  Brights Designer Buttons, Natural Buttons, Linen Thread, Paper Piercing Tool, Essentials Paper Piercing Pack and Mat, Dimensionals, Glue Dots, Stamp-a-ma-jig, Sticky Strip, Sponge Dauber  

Wednesday, September 12, 2012

Christmas Gift Tags with Holder & Envelopes


I have a workshop coming up soon and my Hostess wants to learn how to emboss.  I am going to demonstrate embossing with the Mug from Scentsational Season stamp set.  Four 3x3 cards and envelopes will fit in the gift tag holder that I made from the Scallop Envelope Bigz Die.  This will also be her Hostess gift from me.
 
Thanks for stopping by :-)
 
Cindy
 
 
Stamps:  Scentsational Season, Chock-Full of Cheer, Delightful Decorations, Stylin' Snowfolk, Teeny Tiny Wishes
Paper:  Naturals Ivory, Whisper White, Polka Dot Parade DSP, Silver Glimmer
Ink:  Real Red, Versamark, Crumb Cake
Accessories:  1 1/4" Scallop Circle Punch, Boho Blossom Punch, Holiday Collection Framelits, Scallop Envelope Bigz Die, Pearl Basic Jewel, Silver Glimmer Brad, Silver EP, Heat Tool, Sponge Dauber, Dimensionals


Sunday, August 26, 2012

Stampin' Up! Paper Flowers Tutorial


Stampin' Up! has a new print ad campaign. You'll see these gorgeous new full page ads in magazines like Better Homes & Gardens, Family Fun, and Parents.

This is one of the ads. The print ad includes a link to download a free tutorial to make the flowers pictured in the ad. You don't need to run out and find a magazine though, because I've got the tutorial hook-up for you right here! Click on the image to view the PDF tutorial and make sure to scroll down to the second page for the instructions.


Click HERE to order Stampin' Up! products anytime!
 
Thanks for stopping by :-)
 
Cindy
 

Sunday, October 23, 2011

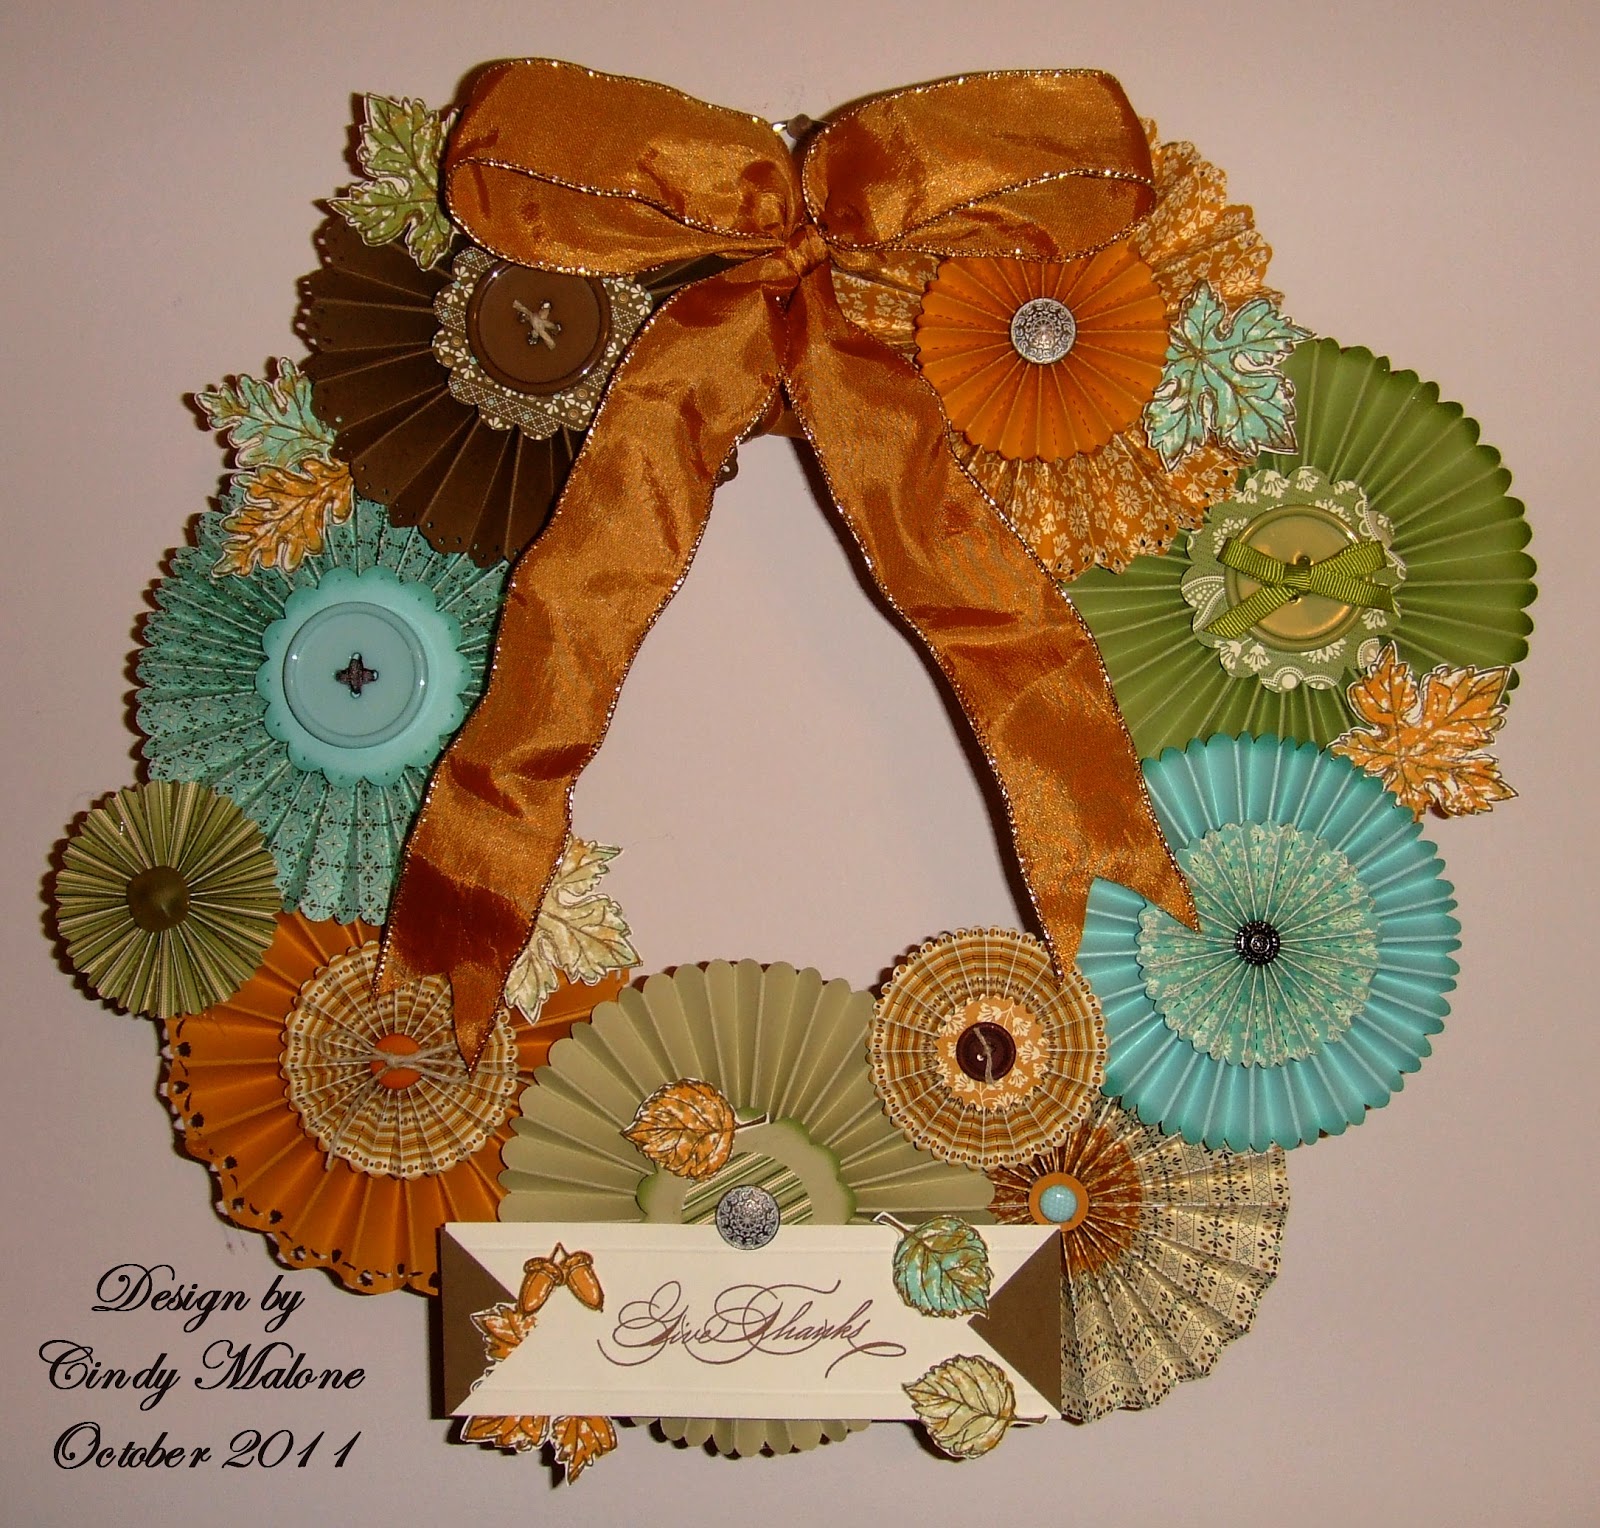
Give Thanks Wreath


I made this wreath for a friend of mine that was having a birthday this month.  I used a 12 inch Styrofoam base, covered it in 2 inch cream colored satin ribbon.  Made all the rosettes and then hot glued everything together, stamped and cut out leaves from Gently Falling and adhered to the wreath with hot glue.  I love the colors in the Spice Cake DSP!

Stamps:  Gently Falling and Hand-Penned Holidays
Paper:  Soft Suede, More Mustard, Pool Party, Pear Pizzazz, River Rock, Very Vanilla and Spice Cake DSP
Ink:  Soft Suede, More Mustard, Pool Party, Pear Pizzazz, River Rock.
Accessories:  Antique Brads, 2011 In-Color Brads, Spice Cake Designer Buttons, other SU buttons, Assorted Ribbon, Twine, Hot Glue w/ Glue Gun.

Thanks for stopping by,
Cindy


Sunday, August 8, 2010

Christmas Cards and Card Box


I can't wait to get my "Holiday Mini" pre-order from Stampin' Up!  OMG I think they out did themselves this year!!!  In the mean time I have been making cards to sell at work.  My co-workers are already bugging me for sets of cards.  I found this easy box to make on Paula's Blog "Inking Addict Designs".
This box will hold 6 cards with envelopes.  Trying to keep cards simple for easy mass production.  The Christmas tree looks like it has garland on it as I used the Two-way Glue Pen and Dazzling Diamonds glitter.  I used a piece of Sticky Strip on the Eyelet Border on the card box and then applied the Fine Galaxy Gold Glitter, what's Christmas without a little bling!  It is not visible in the photo but the Holiday Treasures DSP has been sprayed with Champagne Mist Shimmer Paint.  My recipe, fine mist spray bottle, add shimmer paint (more for lots of sparkle or less, depends on your own taste) then add Rubbing Alcohol and shake well.  Then spray first to make sure you don't get globs then apply to paper.  I use Rubbing Alcohol as it drys faster and does not warp the paper.

Thanks for stopping by and have a great week :-)

Cindy

Stamps:  Heard From The Heart, Patterned Pines, Deer Friends
Paper:  Chocolate Chip, Old Olive, Ruby Red, Whisper White Holiday Treasures DSP
Ink:  Baja Breeze, Old Olive, Ruby Red
Accessories:  Champagne Mist Shimmer Paint, 13/4", 2" & 2 3/8" Scallop Circle Punches, Eyelet Border Punch, 1" & 1 3/8" Circle Punches, Sticky Strip, Fine Galaxy Gold Glitter, Two-Way Glue Pen, Dazzling Diamonds Glitter, Dimensionals 

Monday, August 2, 2010

Birthday Shadow Box Card


I found this wonderful video tutorial at Julie Buhler's Blog - Paper Pleasing Ideas and just had to try it. 
The best feature of this 3-D card is that you can fold it and put it in a regular size envelope!  A friend a work wanted a birthday card for her daughter who loves shades of purple.  So I used Almost Amethyst.

Thanks for stopping by :-)

Cindy

Stamps:  Well Scripted & Pretty Petals
Paper:  Almost Amethyst, Old Olive, Whisper White, Tea Party DSP
Ink:  Almost Amethyst, Certainly Celery, Orchid Opulence
Accessories:  Big Shot, Beautiful Wings Embosslit, Little Leaves Sizzlit, Circle Scissor Plus, Dimensionals, Sponge Dauber

Thursday, July 22, 2010

Post-it Note Holder with Border!


Earlier this week I posted the Post-it Note Holders found HERE.  I changed the instructions just a bit to add the Eyelet Border.  The original length of the Cover 3 1/16" x 8 1/2".  I made mine 3 1/16" x 9".
I like this much better, very feminine.

Thanks for stopping by :-)
Cindy

Paper:  Barely Banana, Pale Plum, Parisian Summer DSP (retired)
Accessories:  Eyelet Border & Boho Blossoms Punches, Rhinestone Brad, Champagne Mist Shimmer Paint, SU Felt Flower, Post-it Note pad, Sticky Strip, Velcro to close flap.

Monday, July 19, 2010

Post-it Note Holders


I have been working on gifts for Christmas already.  I found the instructions for these at Crafts by Beth!
These will make a great gift for the Receptions that work on our floor.  I am also going to include the Pentel R.S.V.P. pen with matching DSP to go along with it.  These are so easy to make and they are soo cute!  The shimmer on the paper is from Champagne Mist Shimmer Paint, I love this paint :-)

Thanks for stopping by,
Cindy

Stamps:  Printed Petals
Paper:  Baja Breeze, Barely Banana, Pretty in Pink, Chocolate Chip, Gable Green, Parisian Breeze DSP, Tea Party DSP, Razzleberry Lemonade DSP
Ink:  Daffodil Delight, Certainly Celery
Accessories:  Felt Flowers, Flower, Corduroy & Rhinestone Brads, Button (unknown), Scallop Punch, Champagne Mist Shimmer Paint, Sticky Strip, Velcro Dots, Post-it Note pads

Friday, July 2, 2010

~Corner Bookmark~


I watched a tutorial on Splitcoaststampers the other day on how to make a Corner Bookmark.  When I watched her make the score lines in the video I thought the Sizzix Bigz Die "Petal Card" (retired) would work great and it would already be scored for me!  I needed a quick going away gift for a girl at work and this is what I made for her.  I used Certainly Celery textured cardstock to make the main frame of the bookmark 4"x4".  Lined up the tip of the 4x4 cardstock onto the tip of the Petal Card die so it only covered two of the score lines that I needed.  I used some Razzleberry Lemonade DSP cut at 2.5"x2.5" and adheard to the center before adhering the petals together.  The flower is made with Vellum Cardstock with the 5-Petal Flower Punch (3) then added the Flower Brad.  Next I cut a 3"x 3" square of So Saffron using the Scallop Corner and Border Punch.  Punch corner first then finish with the border.  I wanted to add this backing so I could adhere the ribbon to the back with Sticky Strip and not be showing!  I then used the Butterfly stamp from the Great Friend stamp set.  Using smooth Certainly Celery cardstock, I stamped 2 butterflies with Versamark and then used Iridescent Ice Embossing powder and cut them out.  I then added a yellow brad to both for a little weight and sandwiched them together with the ribbon with Sticky Strip.
This was fun and easy to make!

Everyone have a fun and safe 4th of July, celebrate your freedom and remember those who made the ultimate sacrifice so that we can live free!

Cindy

Stamps:  Great Friend
Paper:  Certainly Celery Smooth & Textured, So Saffron, Vellum Cardstock, Razzleberry Lemonade DSP
Ink:  Versamark
Accessories:  Sizzix Big Shot, Bigz Die "Petal Card", Scallop Corner & Border Punch, 5-Petal Flower Punch, Flower Brad, plain yellow brad, Crushed Curry Polka Dot Grosgrain Ribbon (retired), Iridescent Ice EP, Heat Tool and lots of Sticky Strip!

Friday, September 25, 2009

Halloween "Side Step" Card


I found this wonderful tutorial on my Fabulous Upline's Blog Julie Davison for the "Side Step" Card.
I love the House of Haunts Stamp Set and thought it would look awesome on the Side Step.
The House and the Owl in the tree were stamped with Versamark added Black Embossing Powder and heated.  On the Owl I used a 1" Circle punch on a post it note to make a mask for the moon. 
I used a 1 3/8 inch mask for the moon on the house.  I then brayered both with Summer Sun. 
Leaving the mask on the Owl I sponged around the edges first with Pumpkin Pie (used Sponge Daubers),
Creamy Carmel.  Did the same with the House but added Chocolate Chip as my last layer.  Once
everything was sponged I removed the post-it notes and layered onto Only Orange Cardstock.
Pumpkins are stamped with Only Orange onto Summer Sun cardstock.  Happy Halloween was
stamped with Versamark and White Embossing Powder.  The finishing touch is the Spider from
Autumn Apparitions.  Stamped in Versamark and Black EP then punched out with the 1/2" circle
punch and applied to a Build-A-Brad.  I really had fun making this card!
Thanks for taking time out of your busy life to visit my blog.
Have a great weekend   :-)

Stamps:  House of Haunts & Autumn Apparitions (retired)
Paper:  Basic Black, Whisper White, Only Orange, Summer Sun
Ink:  Versamark, Only Orange, Summer Sun, Pumpkin Pie, Creamy Carmel, Chocolate Chip
Acc:  White & Black Embossing Powder, Heat Tool, Build-A-Brad, 1/2", 1" & 1 3/8" Circle Punches, Dimensionals

Saturday, September 19, 2009

Saturday Stamp Class at our Local Stamp Store!


Awesome Class today at Prairie Art Stamps & Supplies in Springfield, Illinois.  The Class was given by the Wonderful Wendy Vecchi!  She is a demo artist for Ranger Industries, she designs her own line of stamps "Studio 490" and she is on the Design Team for Maya Road and tim holtz-idea-ology.  This project uses Wendy's Studio 490 stamps and tim holtz Grunge Board & Paper, Distress Ink & Stickles.  Yes, that rose is made out of paper!  What a fun class, I love learning new techniques.  Due to Stampin' Ups new Demonstrator Agreement this will probably be the last time I can share info about other companies products.  I will be able to show you what I have done but cannot share product info because I am a Demonstrator.
Hope everyone is having a great weekend.
Thanks for stopping by  :-)

Monday, December 22, 2008

Gift Card Holder

I needed a quick and easy gift card holder and this is what I came up with. Very Easy. I used a 4" x 8" piece of Ski Slope DSP and Scored it at 3" & 7 ". Used a Snowflake Scallop edge punch on top flap and place a piece of Whisper White behind it. Made a band with Whisper White, it just slides off the holder. The sentiment was stamped with Versamark first then into Baja Breeze onto Whisper White and covered with Irridescent Ice embossing powder.

Stamps: Curly Label Punch Bundle
Ink: Versamark & Baja Breeze
Paper: Whisper White & Ski Slope DSP
Accessories: Curly Label Punch & Dimensionals

Thursday, November 20, 2008

Christmas Tag

I love the Winter Post stamp set. Especially this Reindeer! Stamped on Whisper White cardstock. Loaded stamp with Versamark ink first, then into Classic Choc. Chip, stamped image and then applied Heat & Stick powder and used the Heat Tool then sprinkled on Martha Stewart Brownstone Glitter and heated it again. It's really hard to see but this reindeer really sparkles!
I used the Punch Pals snowflake stamp for background then stamped Merry Christmas.

Stamps: Winter Post, Holidays & Wishes, Punch Pals.
Cardstock: Whisper White, Kiwi Kiss, Riding Hood Red, Baja Breeze, Ski Slope DSP.
Ink: Versamark, Choc. Chip, Riding Hood Red, Baja Breeze.
Accessories: Heat Tool, Horizontal Slot punch, Tag Corner punch, Scallop Circle punch, 1 3/8" Circle punch, Heat & Stick powder, MS - Brownstone Glitter, Offray Ribbon.

Sunday, November 16, 2008

Wedding Gift Bag


I just wanted to give you a closer look at the bag. See previous post for recipe. Thanks :-)

Wedding Card & Gift Bag

Hello Everyone, I had a wedding to go to this weekend so I made a gift bag and matching card!
I used the Simply Scrappin' Kit - Love Stories on the bag and the card. The Gift Bag is from Stampin' Up! also. I used the Certainly Celery cardstock from the kit and the DSP. Used the scallop edge provided in the Kit. The center of my ribbon is a Build-a-Brad. The card has DSP and cut outs from the kit. This was fun to make and I love the Simply Scrappin' Kits, they're not just for scrapbooking!

Supplies: Together Forever Stamp Set, Simply Scrappin kit - Love Stories. Additional cardstock: Whisper White and Pink Pirouette.
Ink: Choc. Chip & Certainly Celery
Accessories: 1/4" Pretty in Pink grosgrain ribbon, 5/8" Regal Rose grosgrain ribbon, 3/8" Mellow Moss Taffeta ribbon. 1 3/8" Circle Punch, 3/4" Circle punch, Dimensionals, Build-A-Brad, Gift Bag, Scallop Edge Punch, Austrian Crystal (center of Flower on card), Sticky Strip & Glue Dots.

Tuesday, October 21, 2008

Tab Punch Pumpkin

I saw this on Splitcoast and just had to give it a try. Very Easy. I have searched Splitcoast but I can't find the photo to send you to the link, Sorry :-( If I come across it I will post it for everyone. I punched 16 tabs and folded them in half and then began to stick them together with Snail Adhesive. I used a brown & green pipe cleaner. When it was time to put the pipe cleaners in the center, I first put a strip of sticky strip on the inside spine of tabs and then I used extra sticky strip to put the last tab together for extra support.

Supplies: Pumpkin Pie Cardstock, Tab Punch, Snail Adhesive, Sticky Strip, & Pipe Cleaners.

LinkWithin

Related Posts Plugin for WordPress, Blogger...