Showing posts with label Christmas. Show all posts

Monday, September 30, 2013

Merry Little Christmas


I received the stamp set "Merry Little Christmas" last week and had this idea in my head for sometime and finally put it on paper.  The "Merry" was cut out of Red Glimmer paper and adhered using Tombo Multi Mono Glue along with the strips of Designer Series Paper.  Allowed to dry completely and then I embossed it with the Perfect Polka Dots embossing folder.  Sponged around the edges with Gumball Green.  Stamped the sentiment on Real Red card stock with Versamark and used White embossing powder. I then cut it in half and used the oval punches.  Popped them up on dimensionals.

Thanks for stopping by :-)
Cindy

Stamps:  Merry Little Christmas
Paper:  Season of Style DSP, Red Glimmer Paper, Real Red, Gumball Green, Whisper White
Ink:  Versamark
Accessories:  Expressions Thinlits Dies, Perfect Polka Dots EF, Oval and Scallop Oval Punches, White EP, Heat Tool, Dimensionals


Tuesday, August 13, 2013

Merry Snow Day


Just had to get this Snow Day stamp set, Snowmen are to stinkin' cute!
He is stamped in Whisper White Craft ink, then I put some re-inker in the lid of the case with a little water and painted him solid white.  This can either be left to dry or use a heat tool to speed up the drying time.  The snow at the bottom was created by tearing the edge of Whisper White card stock, then embossing with Perfect Polka Dots embossing folder.  I then applied Versamark on the rough edge of the paper and used Iridescent Ice embossing powder for some sparkly snow.  Snowflakes in the background were also embossed with Iridescent Ice embossing powder.  The ball cap was made by applying the Washi tape to some Whisper White card stock and then punched out with the Petite Curly Label punch.  Took some paper snips and trimmed off the points on the side of the hat.  Punched another for the bill of the cap in Cherry Cobbler and trimmed off a small piece.  Hat is popped up on a dimensional.  The scarf was made by crocheting a chain, knotting the end and then leaving enough end to fray.  Using the paper piercer, I made a hole on each side of his neck and run the scarf through the holes and held down at the knot with a glue dot. Candy Dots for buttons and the "Merry" was glued directly on top with some Tombow Multi-Mono Liquid Glue.

Thanks for stopping by :-)
Cindy

Stamps:  Snow Day
Paper:  Cherry Cobbler, Crumb Cake, Gumball Green, Whisper White, Season of Style DSP, Red Glimmer
Ink:  Whisper White Craft, Black Stazon, Pumpkin Pie, Versamark
Accessories:  Cherry Cobbler Bakers Twine, Season of Style Designer Washi Tape, Expressions Thinlits, Perfect Polka Dots Embossing Folder, Candy Dots, Petite Curly Label Punch, Iridescent Ice Embossing Powder, Heat Tool, Dimensionals, Glue Dots, Tombo Liquid Glue, Crochet Hook, Paint Brush

Sunday, August 4, 2013

Merry


Trying out the new Expressions Thinlits die, so fun!  
I have always been more for traditional Christmas colors, but I am loving this new color combo in the Winter Frost Designer Series Paper.  I was going to use Pool Party for the "Merry" but it did not so up very well so I used Bermuda Bay.  The sentiment was lined up with a stamp-a-ma-jig, then I used a post-it note to mask off the Merry part of the stamp.  Added the silver ribbon for some sparkle.

Thanks for stopping by :-)
Cindy

Stamps:  Greetings of the Season
Paper:  Bermuda Bay, Pool Party, Smoky Slate, Winter Frost Specialty Designer Series Paper
Ink:  Black Stazon
Accessories:  Silver 1/8" Ribbon, Expressions Thinlits, Stamp-a-ma-jig

Thursday, August 1, 2013

My First Christmas Card


The Holiday Catalog is awesome!  I just had to make a Christmas card as they are my favorite.  The Winter Frost Designer Series Paper is Gorgeous.  The packages are embossed with Iridescent Ice embossing powder.  First I applied Versamark to the stamp and then Coastal Cabana before embossing.  Using the Squares Collection Framelits I made a frame out of
Bermuda Bay to showcase the packages.  Silver embossing powder for the sentiment and some fabulous new bling!

Thanks for stopping by :-)
Cindy

Stamps:  Wishing You
Paper:  Bermuda Bay, Pool Party, Smoky Slate, Winter Frost DSP, Whisper White
Ink:  Coastal Cabana, Versamark
Accessories:  Frosted Finishes Embellishments, Squares Framelits, Whisper White 1/4" Stitched Grosgrain Ribbon, Silver & Iridescent Ice embossing powder, Heat Tool, Dimensionals, Glue Dots

Sunday, December 23, 2012

One More Christmas Card!

I needed one more card, so I made this quick and easy.  The card base is Shimmery White, with a layer of Garden Green, Real Red and Whisper White.  Then I layered a strip horizontal to place the punched Scallop Squares punched out in Shimmery White card stock.  Since Stampin' Up! does not have Green Glimmer paper, I used double sided tape on a piece of whisper white and used Green Glitter on it and then glued it to the back of the scallop.  Popped up the images on some Dimensionals and was done.
 
Everyone have fun and safe Christmas!
 
Cindy
 
Stamps:  Greetings of the Season
Paper:  Shimmery White, Whisper White, Real Red, Garden Green, Champagne and Red Shimmer
Ink:  Real Red
Accessories:  Scallop Square Punch, Merry Minis Punch Pack, Double Sided Tape, Green Glitter, Dimensionals.
 

Sunday, December 9, 2012

Owl Joy

 
I made this card for a friend who loves Owls and anything with lots of glitter!  The Owl was stamped twice, once in Early Espresso and then Cherry Cobbler to give him red eyes.  Hat stamped in Cherry Cobbler and the brim and the ball where covered with Dazzling Diamonds Glitter.  Used the 1/2" Circle Punch for the "O" in Joy and added a Glimmer Brad. For the small circles on the tree, I used a regular hand held office hole punch as that is all I had!  To add even more sparkle, the Whisper White was sprayed with Champagne Shimmer Paint mixed with Rubbing Alcohol.  Oh if only you could see this in person, it dazzles!
 
Thanks for stopping by :-)
 
Cindy
 
 
Stamps:  Owl Occasions, Word Play
Paper:  Festival of Prints DSP, Whisper White, Cherry Cobbler, Gumball Green, Red & Champagne Glimmer
Ink:  Cherry Cobbler, Early Espresso, Gumball Green, Soft Suede
Accessories:  Ornament Punch, Hand Held Office Hole Punch, 1/2" Circle Punch, Glimmer Brads, Googlies, Cherry Cobbler Bakers Twine, Champagne Shimmer Paint, Dazzling Diamonds Glitter, Glue Dots, Dimensionals
 

Sunday, December 2, 2012

Lovely Christmas Tree

 
The timeless stamp set from Stampin' Up! - Lovely as a Tree, always comes in handy for a quick card.  Using Whisper White for my base, embossed with the Northern Flurries embossing folder and sponged with Gumball Green.  Stamped tree and used some Crumb Cake and Soft Suede Markers to to the trunk and branches.  With a hole punch, cut an indent into both sides of the card to help hold the bakers twine in place.  Added the sentiment, rhinestones and some Dazzling Details to the tree branches for a little sparkle.
 
Thanks for stopping by :-)
 
Cindy
 
 
Stamps:  Embellished Events, Lovely as a Tree
Paper:  Whisper White, Cherry Cobbler, Gumball Green
Ink:  Cherry Cobbler, Crumb Cake, Gumball Green, Soft Suede
Accessories:  Northern Flurries EF, Word Window Punch, Basic Rhinestones, Dazzling Details, Cherry Cobbler Bakers Twine, Sponge Dauber

Saturday, November 24, 2012

Clean & Simple Noel

 
I really like to do reverse masking to give my images a frame.  I am also in LOVE with the color Pool Party and find that it goes well with a lot of colors!  First I sponged on the Pool Party using a Sponge Dauber.  Then I stamped the sentiment and then stamped the holly berry vine.  Colored in the berries with Real Red, a light tap on the berry with a white gel pen and then decided it need some bling.  So, I colored some Basic Jewel Rhinestones with a Red Sharpie marker and applied.  Did a line of glue with the 2-Way Glue Pen around the bordered and added some Dazzling Diamonds glitter.  A bow at the top for a finishing touch.
 
I hope everyone had a safe and fun filled Thanksgiving, thanks for stopping by :-)
 
Cindy
 
 
Stamps:  Greetings of the Season, Christmas Blessings
Paper:  Whisper White, Pool Party
Ink:  Early Espresso, Gumball Green, Pool Party, Real Red
Accessories:   Basic Jewel Rhinestones, Sponge Dauber, White Gel Pen, 2-Way Glue Pen, Dazzling Diamonds Glitter, Cherry Cobbler Seam Binding Ribbon, Glue Dots 
 

Saturday, November 17, 2012

Glass Ornaments

 
I wanted to make my ornaments look like that were glass.  The Cherry Cobbler and Marina Mist ornaments were stamped, then applied Versamark and Iridescent Ice embossing powder.  Once heat set I applied more Versamark and Clear embossing powder and heat set again.  The large ornament was first stamped in Gumball Green, cleaned my stamp and added Always Artichoke to the plain stripes with a marker.  Using stamp-a-ma-jig I lined it up and stamped over the Gumball Green.  Cleaned stamp and used a VersaMarker (retired) and applied to the solid stripes, lining it up and stamping one more time and then applied Iridescent Ice EP.  Heat set and then applied Versamark all over the ornament and applied a layer of Clear EP.  All the embossing really gave the ornaments a depth and somewhat glass look.  The background was done with the Fancy Fan embossing folder, with a sponge dauber I applied some Champagne Shimmer paint to the raised areas.  The sentiment was stamped onto Shimmery White card stock and sponged with Gumball Green.  All in all, I am quite pleased with the look of this card.  I must say, it looks way better in person!
 
Thanks for stopping by :-)
Cindy
 
 
Stamps:  Ornament Keepsakes, Greetings of the Season
Paper:  Whisper White, Shimmery White, Cherry Cobbler, Gumball Green, Be of Good Cheer DSP, Silver Shimmer
Ink:  Cherry Cobbler, Gumball Green, Marina Mist, Always Artichoke, Versamark
Accessories:  Holiday Ornaments Framelits, Scallop Edge and Large Oval Punches, Iridescent Ice and Clear embossing powder, Heat Tool, Cherry Cobbler Bakers Twine, Sponge Daubers, Glue Dots, Dimensionals.

Sunday, November 11, 2012

Glimmer Ornament

 
Wow, what a crazy week, have not had time to post!  Life happens ;-)
I started out with a piece of Shimmery White card stock and die cut the ornament and pierced around it.  Then die cut the bottom edge and embossed it and stamped my sentiment in Cherry Cobbler.  Using the 1 1/4" Scallop Circle I punched out some Red Glimmer paper and pierced the scallops and added an Antique Brad with a Basic Rhinestone on top.  The Champagne Glimmer paper was adhered to the Whisper White card stock base. The Shimmery White was popped up on dimensionals along with the center of the ornament.  Added a little ribbon to finish it off.
 
Thanks for stopping by :-)
 
Cindy
 
 
Stamps:  Christmas Blessings
Paper:  Whisper White, Shimmery White, Red and Champagne Glimmer
Ink:  Cherry Cobbler
Accessories:  Holiday Ornaments Framelits, Adorning Accents Edgelits and Embossing Folder, 1 1/4" Scallop Circle Punch, Festive Paper Piercing Pack, Antique Brads, Basic Rhinestones, 1/8" Real Red Taffeta Ribbon, Glue Dots, Dimensionals
 

Sunday, November 4, 2012

Vintage Christmas

I was playing around with the Core'dinations card stock and decided to turn it over and sand the debossed side for something different.  I sponged around the edges with and sponge dauber and some Crumb Cake Classic ink. Merry Christmas was stamped in Cherry Cobbler.  I stamped the Poinsettia's with Black Stazon onto water color paper.  I water colored with blender pens and Classic Ink.  I started out the poinsettia's with Pretty in Pink and then Real Red.  The poinsettia leaves were done in Gumball Green and the pine boughs were first colored with Always Artichoke then some Soft Suede down the middle and then did the tips in Gumball Green.  I sprayed the Poinsettia's with Champagne Mist mixed with rubbing alcohol to give it some shimmer.  The sentiment seemed a little lonely in the middle all by itself so I stamped some snowflakes and embossed them with Iridescent Ice embossing powder.  This card is way prettier in person, I wish you could see the sparkle!
 
Thanks for stopping by :-)
 
Cindy
 
 
Stamps:  Greetings of the Season, Bells & Boughs, Snow Swirled
Paper:  Water Color, Naturals Ivory, Core'dinations Gumball Green
Ink:  Versamark, Black Stazon, Cherry Cobbler, Pretty in Pink, Real Red, Gumball Green, Soft Suede, Always Artichoke, Daffodil Delight, Crumb Cake
Accessories:  Lacy Brocade EF, Iridescent Ice EP, Heat Tool, Blender Pens, Sponge Daubers, Champagne Mist, Labels Framlits, Glue Dots, Dimensionals
 

Monday, October 29, 2012

Elegant Ornament


I did another Christmas card in silver and white (click here to see that post) so I decided to do one in gold and silver using the Ornaments Keepsakes stamp set.  The base of the card is Shimmery White card stock, then a panel of Brushed Gold then another layer of Shimmery White embossed with the Fancy Fan Folder.  The ornament and sentiment were both stamped on Shimmery White card stock.  Added a little bling by adding some Champagne Shimmer paper a pearl and some ribbon.
 
Thanks for stopping by :-)
 
Cindy


Stamps:  Ornament Keepsakes, Greetings of the Season
Paper:  Shimmery White, Brushed Gold, Champagne Shimmer
Ink:  Versamark
Accessories:  Holiday Ornaments Framelits, Fancy Fan Folder, Gold EP, Heat Tool, Basic Pearls, Whisper White Taffeta Ribbon, Glue Dots, Dimensionals


Wednesday, October 24, 2012

Poinsettia Christmas

 
I started out by making a mask and sponging around the edges with Whisper White Craft ink and then stamped the snowflakes and allowed to air dry while I did some water coloring.
The Poinsettia's were stamped with Black Stazon onto water color paper.  Using a blender pen I started with a light application of Pretty in Pink, then Real Red a bit of Cherry Cobbler in the shadows and some white gel pen for highlights.  The Blender Pen will blend the white gel pen.  Some Daffodil Delight in the center with some Dazzling Details for some bling. The leaves were made from extra poinsettia's that I stamped.  Cut everything out and put together with glue dots and popped them up on Dimensionals.
 
Thanks for stopping by :-)
 
Cindy
 
Click Here to Shop for Stampin' Up! Products Anytime!
 
Stamps:  Christmas Blessings, Snow Swirled, Greetings of the Season
Paper:  Water color, Crumb Cake, Whisper White, Champagne Glimmer
Ink:  Whisper White Craft, Black Stazon, Cherry Cobbler, Real Red, Pretty in Pink, Daffodil Delight, Gumball Green
Accessories:  Sponge Daubers, Blender Pen, White Gel Pen, Dazzling Details, Glue Dots, Dimensionals


Friday, October 19, 2012

Snowy Noel

 
I was wanting a snowy background so I used a Labels Framelits die  as my template.  First I sponged around the edge and then stamped my snowflakes.  Remember, you must let the Craft ink dry or heat set it before doing anything else!  Made the tree by just making a triangle and adding some rhinestones colored with a Red Sharpie.  The edge of the tree was sponged with Gumball Green first and then just on the very edge with Early Espresso to make it stand out a bit more.  The star was die cut with the Holiday Collection Framelits.  Easy card and layout.
 
Thanks for stopping by :-)
 
Cindy
 
 
Stamps:  Greetings of the Season, Snow  Swirled
Paper:  Be of Good Cheer DSP, Red, Silver & Champagne Glimmer, Crumb Cake, Early Espresso
Ink:  Whisper White Craft, Cherry Cobbler, Gumball Green, Early Espresso
Accessories:  Basic Jewel Rhinestones, Red Sharpie, Labels and Holiday Collection Framelits, Sponge Daubers, Dimensionals
 

Tuesday, October 9, 2012

Frosty Greetings

 
Hey, hey, more snow people!  This stamp is so cute and easy to color.  They were looking kind of lonely on the paper by themselves so I decided to add the pine tree.  Some white embossing on the sentiment and a button and of course a lot of glitter (hard to see, click on photo and it will enlarge).
 
Thanks for stopping by :-)
 
Cindy
 
Click Here to Shop for Stampin' Up! Products Anytime!
 
Stamps:  Frosty Friends, Greetings of the Season, Lovely as a Tree
Paper:  Festival of Prints DSP, Whisper White, Bashful Blue, Real Red
Ink:  Black Stazon, Gumball Green, Crumb Cake, Early Espresso, Real Red, Basic Gray, Marina Mist, Daffodil Delight, Bashful Blue, Pumpkin Pie
Accessories:  Brights Collection Button, 1/8" Real Red Taffeta Ribbon, White EP, Heat Tool, 2-Way Glue Pen,
Dazzling Diamonds Glitter, White Gel Pen, Dazzling Detail - Clear & Red, Corner Rounder.

Saturday, September 29, 2012

Festive Snowman

 
I love Snowmen!  So do a few of my friends so I'm sure it will go to one of them.  Started with a 1 1/4" x 12" strip of whisper white card stock and scored every 1/8" and used Sticky Strip to adhere the ends together.  The rosette was then held down and I used Hot Glue in the center to hold it together.  I free hand cut the nose, the eyes are from the Owl Builder Punch along with the hearts on his smile.  Smile made with Oval Punch, slide paper in just a bit and cut then slide it back in and cut again, you can make your smile thick or thin depending on your taste.  For the holly leaves, I used the oval punch scored down the middle and did some more free hand cutting.  The berries were punched using the Cupcake Builder punch.  I made the bow tie with one of the Holiday Ornaments Framelits die cut twice and hot glued the center together.  To give a little definition to the tie, I used a black sharpie.  The card size is 5 1/4" x 10 1/2", stamped the snowflakes in Versamark and then sprayed with Champagne Shimmer mist mixed with rubbing alcohol for some shimmer. 
 
Thanks for stopping by :-)
 
Cindy
 
 
Stamps:  Snow Swirled
Paper:  Crumb Cake, Whisper White, Basic Black, Real Red, Gumball Green, Pumpkin Pie, Red & Silver Glimmer
Ink:  Versamark, Real Red
Accessories:  Punches - Corner Rounder, Owl Builder, Cupcake Builder, Large Oval.  Holiday Ornaments Framelits, White Gel Pen, Simply Scored, Hot Glue, Sticky Strip, Dimensionals, Champagne Shimmer Paint
 

Monday, September 24, 2012

White Christmas

 
I had a challenge from a friend of mine who wanted a Silver and White Christmas Card.  The tree and sentiment were stamped in Versamark and embossed with silver embossing powder.  Being white on white, I wanted to add some layers to give it some depth.  The tree is popped up with dimensionals onto a layer of whisper white and then layered onto Silver Glimmer paper.  Embossed another piece of whisper white and used the Lacy Brocade embossing folder for some texture and glued to the card  base.  The Silver Glimmer paper was also popped up on dimensionals.  I hope she likes my creation!
 
Thanks for stopping by :-)
 
Cindy
 
 
Stamps:  Snow Swirled, Teeny Tiny Wishes
Ink:  Versamark
Paper:  Whisper White, Silver Glimmer
Accessories: Lacy Brocade Embossing Folder, Silver EP, Heat Tool, Silver Glimmer Brad, 5/8" Whisper White Satin Ribbon (retired), Dimensionals


Wednesday, September 19, 2012

Christmas Gift Tags

 
I had some scraps left over from other projects and thought I would use them on gift tags.  The Snowman face was easy, made with punches all except his nose which I stamped from the Stylin' Snowfolk stamp set, clear embossed and then cut out.  The best part about these tags is the receiver can use them has ornaments the following year.  I love dual purpose items.
 
Thanks for stopping by :-)
 
Cindy
 
 
Stamps:  Ornament Keepsakes, Scentsational Season, Stylin' Snowfolk, Snow Swirled, Teeny Tiny Wishes
Paper:  Whisper White, Very Vanilla, Early Espresso, Real Red, Basic Black, Gumball Green, Be of Good Cheer DSP, Core'dinations Gumball Green, Red & Silver Glimmer
Ink:  Versamark, Soft Suede, Early Espresso, Chocolate Chip, Gumball Green, Black Stampin' Write Marker
Accessories:  Framelits - Labels Collection, Holiday Ornaments, Holiday Collection.  Punches - 1" Square, Word Window, Small Heart, Owl Builder, Extra Large Oval, Corner Rounder.  Real Red button, Linen Thread, Rhinestone, White Gel Pen, Clear & Silver EP, Heat Tool, Glue Dots, Dimensionals.  Ribbon - 1/4" Stitched in Whisper White and 1/8" Taffeta in Real Red.
 

Wednesday, September 12, 2012

Christmas Gift Tags with Holder & Envelopes


I have a workshop coming up soon and my Hostess wants to learn how to emboss.  I am going to demonstrate embossing with the Mug from Scentsational Season stamp set.  Four 3x3 cards and envelopes will fit in the gift tag holder that I made from the Scallop Envelope Bigz Die.  This will also be her Hostess gift from me.
 
Thanks for stopping by :-)
 
Cindy
 
 
Stamps:  Scentsational Season, Chock-Full of Cheer, Delightful Decorations, Stylin' Snowfolk, Teeny Tiny Wishes
Paper:  Naturals Ivory, Whisper White, Polka Dot Parade DSP, Silver Glimmer
Ink:  Real Red, Versamark, Crumb Cake
Accessories:  1 1/4" Scallop Circle Punch, Boho Blossom Punch, Holiday Collection Framelits, Scallop Envelope Bigz Die, Pearl Basic Jewel, Silver Glimmer Brad, Silver EP, Heat Tool, Sponge Dauber, Dimensionals


Monday, September 10, 2012

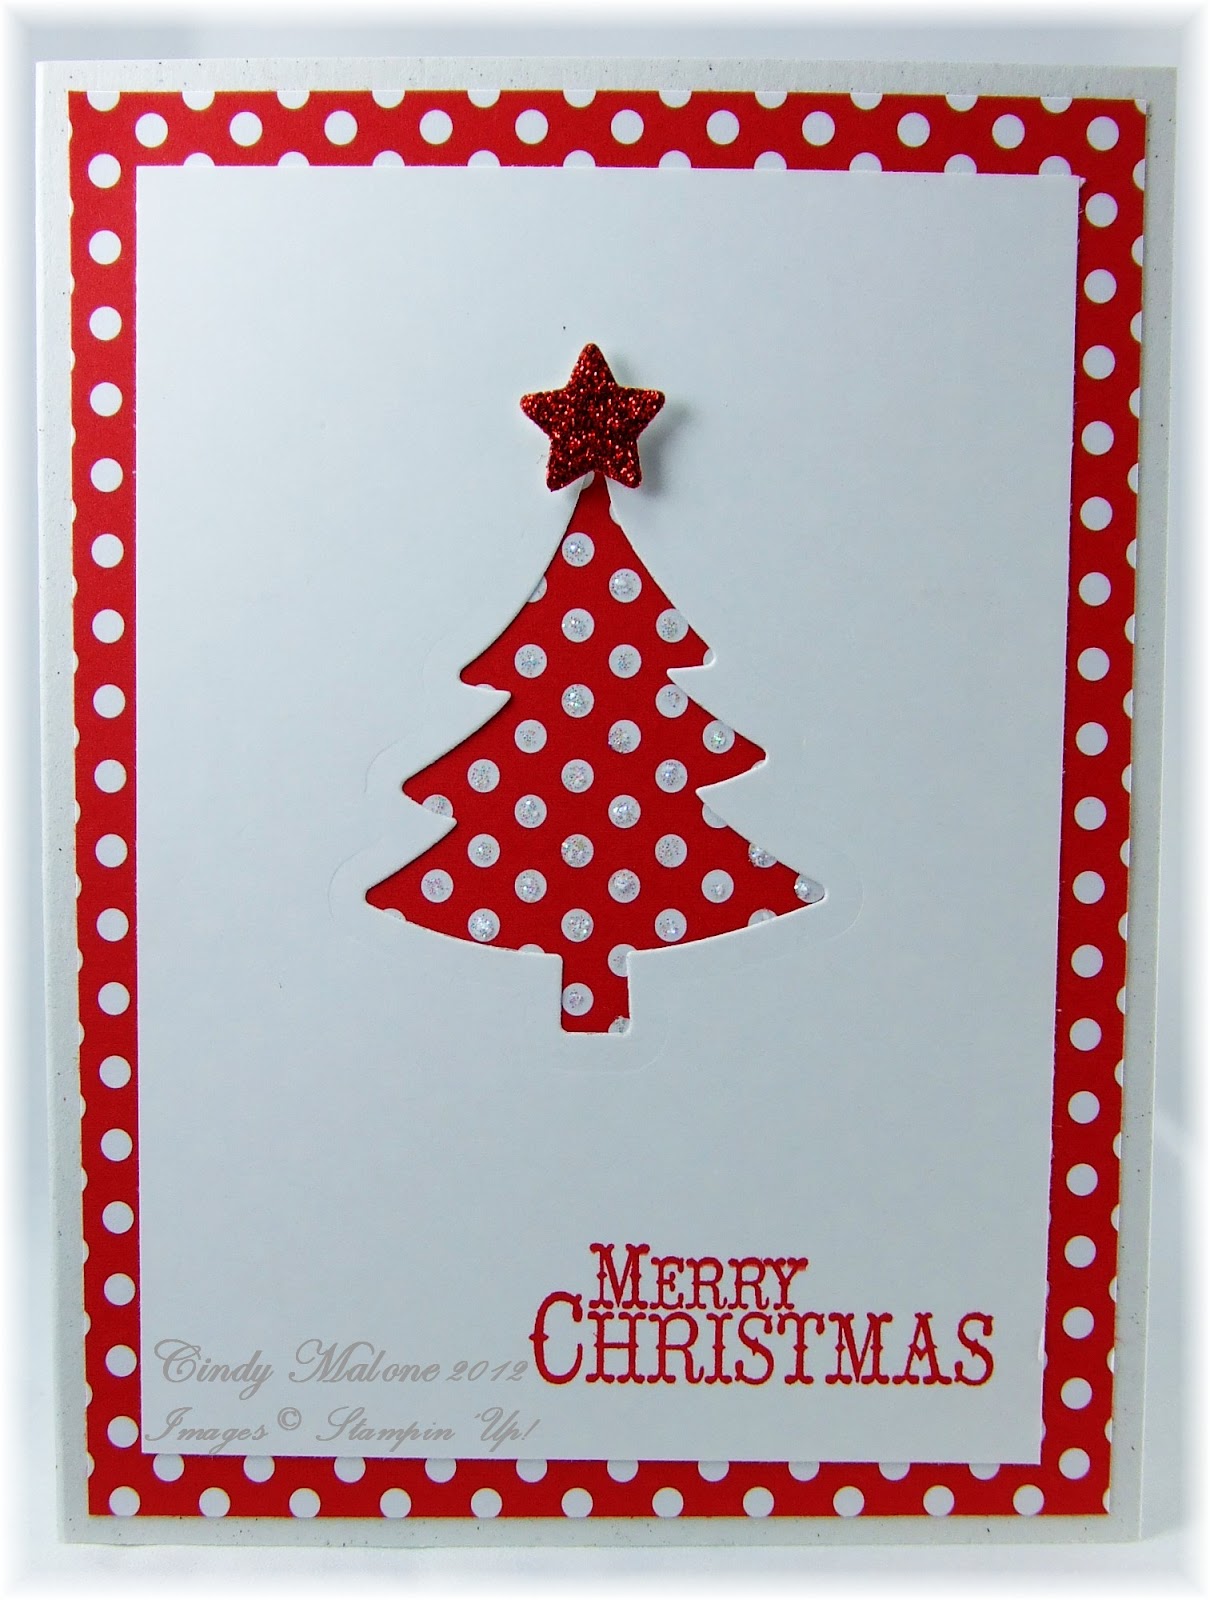
Easy Christmas Card

I wanted to make some quick cards.  Using the Holiday Collection Framelits makes it easy.  Using the tree on the Whisper White and the star on the Red Glimmer paper layer onto Polka Dot Parade DSP pop the star up on a dimensional, stamp the sentiment and place on card.  I also added a little bling with Dazzling Details on the polka dots of the tree.  This would make a great stamp-a-stack.

Thanks for stopping by :-)

Cindy


The tree was done by using the Tree Framlit  that was in the Holiday Collection.


Stamps:  Chock-Full of Cheer
Paper:  Naturals Ivory, Polka Dot Parade DSP, Whisper White, Red Glimmer
Ink:  Real Red
Accessories:  Holiday Collection Framelits, Dazzling Details, Dimensionals.


LinkWithin

Related Posts Plugin for WordPress, Blogger...